Isotemp -86°C Freezer
Maintenance
Cleaning the Condenser
Clean the condenser at least every six months; more often if the laboratory area is dusty.
To clean the condenser, complete the following steps:
- Pull the grille door open.
- Vacuum the condenser.
- Inspect the filter cleanliness and clean as required.
- Close the grille door.
Cleaning the Condenser Filter
Clean the condenser filters every two or three months.
- Pull the grille door open.
- Remove the filter.
- Shake the filter to remove loose dust, rinse the filters in clean water, shake the excess water from the filter, and replace the filter.
- Close the grille door.
Gasket Maintenance
Periodically check the gaskets around the door for punctures or tears. Leaks are indicated by a streak of frost which forms at the point of gasket failure. Make sure that the cabinet is level.
Keep the door gaskets clean and frost free by wiping gently with a soft cloth.
Defrosting the Freezer
Defrost the freezer once per year or whenever the ice buildup exceeds 3/8”. To defrost, complete the following steps:
- Remove all products and place in another ULT freezer.
- Turn off the freezer.
- Open the outer door and all inner doors.
- Let the freezer stand with doors open for at least 24 hours. This allows both the interior and foamed refrigeration system to warm to room temperature.
- Dispose of the ice and wipe out any water standing in the bottom of the cabinet.
- If there is freezer odor, wash the interior with a solution of baking soda and warm water.
- Clean the exterior with any common household cleaner.
- Close the doors, restart the freezer and reload.
Battery Maintenance
The freezer monitors the voltage status of the battery daily and indicates the battery’s voltage via visual and auditory alarm. Replace the battery as indicated by system alarms or as necessary per individual status evaluation. Check the battery connections regularly. Although not required, annual battery replacement is recommended to ensure proper battery status in the event of power failure.
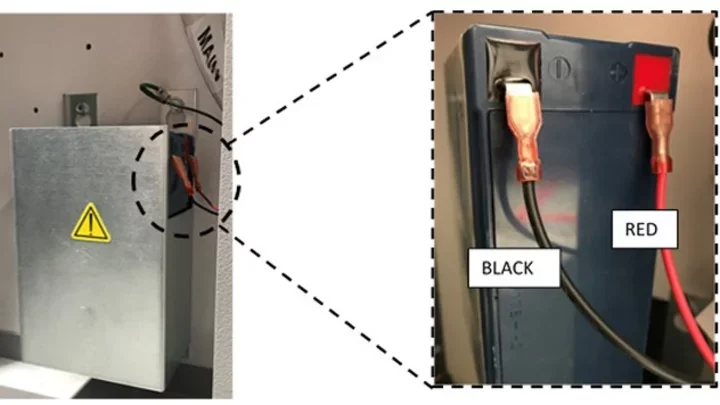
For safety, it is recommended to power off the unit and disconnect it from the power source before replacing the battery. Battery terminals are color coded in red and black. Ensure the corresponding colored wires are connected to the matching color terminals on the battery. The battery is installed with terminals oriented toward the condenser compartment or hinge side of the freezer’s outer door. With proper installation, the red wire should be connected to the rear battery (positive) terminal and the black wire to the front (common) terminal.
Failure to properly connect the battery can damage electrical components and potentially hinder normal operation of the freezer. Consult a certified service technician if there are any questions or concerns about battery maintenance.
- Rechargeable sealed lead-acid battery, 12 V, 7.0 Amp Hr.
- Replacement batters can be purchased directly from the Fisher Scientific Channel
Maintenance Schedule
Regular Maintenance is important to keep the unit working properly. Inspect/Clean as directed in the manual.
- Ice/Frost Build Up: To maintain proper closure of inner doors, remove any ice or frost build up around the gasket, inner doors, and breakers as necessary.
- Gasket: Periodically check the gaskets around the door for punctures or tears. Periodically clean the ice-build up around the gasket.
- Filter: Clean the condenser filter(s) every two to three months.
- Condenser: Clean every six months, more often if the laboratory area is dusty.
- Battery: Replace the battery as indicated by system alarms or as necessary per individual status evaluation. Check the battery connections regularly. Although not required, annual battery replacement is recommended to ensure proper battery status in the event of power failure.
- Defrost: Defrost the freezer once a year or when the ice build exceeds 3/8” (0.95 cm).
Troubleshooting Guide
This section is a guide to troubleshoot general operational problems.
Unit Warming & Unit Recovers Slowly/Cannot Reach Set Point
- Cause: Warm load / Over load.
- Solution: Allow ample time to recover from loading warm product. Do not overload cabinet.
- Cause: Hot environment
- Solution: Check, if the location meets ambient requirements (within 15°C to 32°C or 59°F to 90°F) and away from hot objects.
- Cause: Dirty condenser and condenser filter.
- Solution: Clean condenser and filter.
- Cause: Not enough space for air circulation.
- Solution: Install the unit in a level area free from vibration with a minimum of 8" (20 cm) of space on the top and sides, 6" (15 cm) in back.
- Cause: Icing/Frost due to high relative humidity.
- Solution: Check if the location meets requirements. Maximum relative humidity 60% for temperatures within 15°C to 32°C (59°F to 90°F).
- Cause: Excess frost build-up in chamber.
- Solution: Defrost the unit.
- Cause: Frost build-up on outer door gasket.
- Solution: Occasionally scrape the ice on the gasket. Do not use a sharp tool. Be careful not to puncture the rubber gasket.
- Cause: Gasket damage.
- Solution: Check for punctures or tears on gasket. Replace if necessary.
- Cause: Prolonged door openings.
- Solution: Avoid opening of door for a prolonged time. Allow ample time for recovery after door opening.
- Cause: Inadequate power supply.
- Solution: Check for proper voltage to the unit.
- Cause: Either of the compressors are not working.
- Solution: Call service.
Unit Interface Failure
Cause: Breaker switch off
Solution: Check circuit breaker and reset to on position. Always use a dedicated, properly grounded circuit.
Power Failure to the Unit
Cause: Power supply stopped/ Breaker switch off
Solution:
- Confirm that the cord is securely plugged in.
- Plug another appliance into the outlet to see if power is present.
- Always use a dedicated, properly grounded circuit.
Unit Tripping the Circuit Breaker
- Cause: Shared power source.
- Solution: Never connect unit to overloaded power source. Always use a dedicated (separate) circuit.
- Cause: Unit plugged into wrong power outlet.
- Solution: Plug the unit into proper power source to delivery correct voltage.
- Cause: Unit not grounded.
- Solution: Your unit must be properly grounded in conformity with national and local electrical codes. Troubleshooting procedures involving live voltage is dangerous and if done improperly can result in injury and/or death. This troubleshooting should be performed by trained personnel only.
- Cause: Use of extended cords.
- Solution: Do not use an extension cord. Make sure the unit supplied power cord is plugged directly into power outlet.
Excessive Frost Build-Up Around Perimeter of Door
- Cause: Icing/Frost due to high relative humidity.
- Solution: Check if location meets requirements. Maximum relative humidity 60% for temperatures within 15°C to 32°C (59°F to 90°F). Occasionally scrape the ice on the outer door. Be careful not to puncture the rubber gasket.
- Cause: Excessive and prolonged door openings.
- Solution: Avoid opening door for a prolonged period of time.
- Cause: Gasket damage
- Solution: Check for punctures or tears on gasket. If replacement is necessary, call service.
Unit is Over Cooling
- Cause: Set points may have changed.
- Solution: Adjust the setpoint to run at desired setpoint under settings.
- Cause: Temperature offset may have changed.
- Solution: Try adjusting the offset. Temperature offset can be set by accessing the settings menu via the settings button.
- Cause: Unknown
- Solution: Try re-starting the unit. If this doesn't help call service.
Unit Compressors Run Continuously
- Cause: Freezer set point is low.
- Solution: Check whether the setpoint is in operating range. Change the setpoint if necessary.
- Cause: Frost build up.
- Solution: Defrost the unit.
- Cause: Dirty condenser.
- Solution: Clean the condenser and condenser filter.
- Cause: Gasket Damage.
- Solution: Check for punctures or tears on gasket. If replacement is necessary, call service.
Cabinet Temperature Reached Alarm Condition, But is Not Activated
Cause: Alarm setpoints may be changed.
Solution: Check the present setpoints for temperature alarm conditions. Change the setpoints if required.
Problem with Temperature Validation/Calibration
Cause: Cabinet temperature displayed doesn't match with actual temperature.
Solution: Customers performing on-site temperature calibration may observe as much as a 2°C variation when an external probe is placed next to the freezer control probe. This variation is normal due to optimisation of the control system to ensure temperature uniformity throughout the cabinet.
Unit is Constantly Alarming
- Cause: Exterior door is closed but not sealed completely.
- Solution: Clean any ice build-up on gasket and/or cabinet surface. Check for punctures or tears on gasket.
- Cause: Door open alarm, exterior door not closing completely.
- Solution: Open door completely and immediately close and latch it.
- Cause: Door open alarm, exterior door is closed but not sealed completely.
- Solution: Defrost exterior door gasket and make sure the door is completely sealed.
- Cause: Alarm set points may have changed.
- Solution: Change the set points as required.
Unit Cycle On-Percentage is Increasing
- Cause: Ambient Conditions & Warm load/over load.
- Solution: Unit performance is directly impacted by these causes mentioned. Try maintaining ambient conditions, reducing load, reducing door openings.
Cause: Frequent and prolonged door openings.
- Solution: Once temperature is stable, cycle dynamics should return to normal range. If not call service.
Difficult to Close/Open the Outer Door
- Cause: Unit is not level.
- Solution: Make sure the unit is level.
- Cause: Frost accumulated on outer door gasket.
- Solution: Scrape the ice occasionally on outer gasket. Do not puncture gasket.
- Cause: Door latch problem.
- Solution: Ensure door latch is securing. If issues persists, call service.
Difficult to Close/Open Inner Door
- Cause: Frost accumulated around inner door.
- Solution: Remove frost or ice build-up from inner door assembly.
- Cause: Inner door latches damaged.
- Solution: Call service.
Vibration/Rattling Noise
- Cause: Unit is not level.
- Solution: Check if the unit is installed in a level area free from vibration.
- Cause: Loose side panels.
- Solution: Check side panel screws, tighten them if necessary.
- Cause: Rubber tubing separators and/or compressor dampeners may have loosened.
- Solution: Call service.